We have set up TensorFlow environment and successfully compile on our PC. Now let us start using the tensorflow for classifying the image.
1. Open the PC command prompt.
2. key in "git clone https://github.com/tensorflow/models.git" to start to clone TensorFlow Models into your PC.
 3. Now access the model's path by key-in "cd models/tutorials/image/imagenet", then try run the modules script by key in "python classify_image.py"
4. you will get the output below if the script compile is a success.
 But.... if output this, then follow step5- step7 to fix it before proceeding.
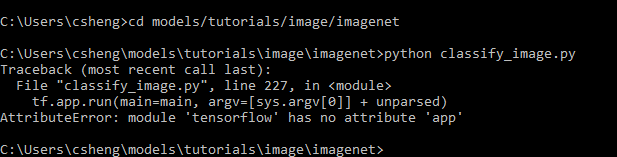 Step 5: This error is caused by Tensorflow version installed on your PC not yet support for the module. So key in "pip uninstall tensorflow" to uninstall tensorflow from your system.
 For example, my PC installed tensorflow 2.00, then i need to downgrade to others version of tensorflow. You can refer to official site < Topic: tested build configurations> for relateTensorFlow version.
Step 6: Reinstall Tensorflow (version 1.9), key in" pip install --ignore-installed --upgrade tensorflow==1.9"
 Step 7: Please follow step 3 again once install tensorflow version1.9 was a success.
Now let start test TensorFlow Image Claaification on PC.
Step 1: Download image from google Example, i download image Rocket and Ice Cream from google then rebame it as images and images2. Then save these image on "C:\Users\csheng\models\tutorials\image\imagenet"
 Step 2: start to verify the images by key in "imagenet>python classify_image.py --image_file images2.jpeg". Then you will get output here.
 Step 2: start to verify the images2 by key in "python classify_image.py --image_file images.jpg". Then you will get output here.

Done!!
** Note: Please make sure that the extension image input must correct. For example about " images " was jpg and images2 was jpeg.
1. Open the PC command prompt.
2. key in "git clone https://github.com/tensorflow/models.git" to start to clone TensorFlow Models into your PC.
4. you will get the output below if the script compile is a success.
Step 6: Reinstall Tensorflow (version 1.9), key in" pip install --ignore-installed --upgrade tensorflow==1.9"
Now let start test TensorFlow Image Claaification on PC.
Step 1: Download image from google Example, i download image Rocket and Ice Cream from google then rebame it as images and images2. Then save these image on "C:\Users\csheng\models\tutorials\image\imagenet"
Done!!
** Note: Please make sure that the extension image input must correct. For example about " images " was jpg and images2 was jpeg.
Comments
Post a Comment